
To charge an electric bike, use the charger supplied for its battery, choose a suitable charging location, and follow the equipment’s connection instructions. The useful habit is to check the setup before plugging in and recognise when charging has finished, rather than leaving the bike connected until your next ride.
Short answer: Follow these 5 stages: check the equipment, prepare the location, connect as instructed, monitor charging, and disconnect when complete. Use the supplied charger or a manufacturer-approved replacement, and remain present and awake. The correct connection order and completion signal come from the instructions for your battery and charger.
This guide covers everyday charging of lithium-battery e-bikes. It also gives dealers a practical handover checklist. For the separate question of how long a charge takes, see our charging-time guide.
1. What should you check before plugging in?
Identify the charger that belongs with this battery. If several bikes share a home or shop, keep each charger with its matching equipment. A plug that fits is not proof of compatibility: the U.S. Consumer Product Safety Commission warns that chargers sold as universal can fit a device yet be unsuitable for it.
Before charging, look over the battery casing, charger and cables for damage. Do not charge a battery that has been dropped or appears damaged. Let a battery cool after use before starting. These checks follow London Fire Brigade’s charging guidance.
For a new bike, find three items in the supplied instructions before the first charge: the charging connection sequence, the normal charging indication, and the completion indication. Keep that page accessible. It is more useful than copying the light colours or key positions from another bike’s video.
2. Where should you charge, and must you remove the battery?
Choose a dry location with a firm, flat charging surface, away from combustible items and exit routes. Keep the charger and battery uncovered. Follow the equipment’s permitted charging-temperature range; do not substitute a universal temperature limit. London Fire Brigade recommends a hard, flat surface and keeping escape routes clear; the UK Department for Transport also advises against damp locations and covering charging equipment. Away from home, check whether an EV charging station can charge an e-bike.
Removal is an option only when the battery is designed for it and its instructions allow separate charging. Bosch’s eBike Battery Guide, charging section describes both on-bike and separate charging for its systems. That does not establish the removal procedure for another manufacturer’s bike.
- Charging on the bike: first check whether the bike can stand in a suitable place with access to the prescribed charging port.
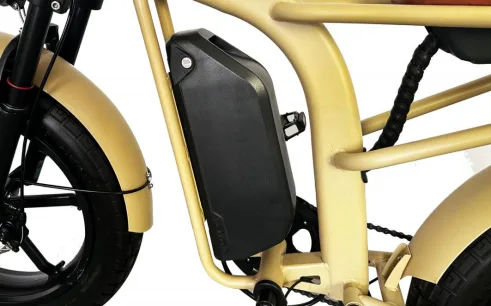
- Charging a removed battery: use the documented release procedure, support the battery while removing it, and place it securely for charging.
- No suitable location: change the charging arrangement before connecting. Do not make an obstructed hallway the default because its socket is convenient.
3. How do you connect and confirm charging has started?
First identify the charging port shown in the equipment instructions and match it to the approved charger. Keep the bicycle stable and arrange the cable so it will not be pulled or walked across. Then follow the stated power/key position and connection order for that equipment.
After connecting, check for the documented charging indication. A light being on, off or green is not meaningful without the indicator key for that charger. Use the following sequence:
- Normal charging indication appears: leave the setup undisturbed and continue supervising the session.
- A fault indication appears: record it and follow that equipment’s fault instructions. Do not substitute a different charger to see what happens.
- No expected indication appears: do not count the session as successful charging or assume the battery is full. Compare the state with the manual before continuing.
A documented example: the SHIMANO EC-E6002 manual lists a steady charger light for charging and a flashing light for an error. It lists several reasons for an unlit lamp: no battery connected, at least one hour after charging finished, or at least one hour after an error. That is why “the light is off” alone cannot establish successful completion. These meanings apply to that named charger, not automatically to BG EBIKE equipment.
For replacement equipment, our charger compatibility guide explains how to identify the approved pairing.
4. What should you watch for during charging?
Remain present and awake. CPSC advises against charging while sleeping. Plan a session you can supervise rather than connecting the bike immediately before leaving home.
Stop charging if the battery becomes unusually hot, swells, leaks, smells unusual, or makes hissing or cracking sounds. If safe, switch off and unplug the charger; stop using the equipment and seek professional guidance. If there is smoke or fire, leave, stay outside and call your local emergency number. Do not approach a smoking battery to disconnect or move it. The Department for Transport identifies these warning signs in its battery-safety guidance linked above.
5. How do you finish charging and prepare for the next ride?
Look for the completion state specified for the battery and charger, then disconnect in their stated order. CPSC recommends unplugging after the charging cycle finishes. Do not infer completion only from elapsed time or from a lamp that has gone dark.
Before moving the bicycle, check that the charging cable is fully disconnected and put away. Close any charging-port cover as instructed. If you removed the battery, reinstall it, engage its retaining mechanism and complete the normal pre-ride check. This separates the end of charging from the separate task of making the bicycle ready to ride.
What should a dealer demonstrate at handover?
A short demonstration on the supplied bike can turn the manual into something the customer knows how to use. Show the charging port, correct equipment, connection sequence, normal indication and completion indication. If separate battery charging is supported, demonstrate removal and secure refitting too.
Then ask the customer to point out the port and identify the relevant instructions themselves. This is a practical handover suggestion, not a claim that a demonstration replaces the manual. Keep the battery and charger references with the vehicle record so later support requests can be matched to the delivered configuration.
When you compare battery versions for an order, check the main wholesale price drivers and allow for dangerous-goods booking of lithium containers, covered in export packaging and shipping.
Frequently asked questions
Do I need to run the battery empty before charging?
No—lithium-ion e-bike batteries do not need a full discharge before each charge. Bosch’s battery guide explains that lithium-ion batteries have no memory effect and can accept partial charging. Plan top-ups around your rides and the battery manufacturer’s advice. Do not deliberately ride until assistance shuts down as a routine preparation for charging.
Can I use an extension lead to reach my bike?
Use one only if the equipment instructions permit it and the lead is suitable for the electrical load and location. The Department for Transport advises against overloading sockets or extension leads and says leads should be uncoiled and suitably rated. A closer charging location may be more practical than routing a cable across a walkway.
Can I move or fold the bike while it is connected to the charger?
Finish the charging session and disconnect the equipment before moving or folding the bike. A connected cable can be pulled, trapped or used accidentally as a restraint. The SHIMANO charger manual cited above specifically warns against moving the bicycle during charging. Choose a stable charging position before connecting so you do not need to rearrange it midway through the session.
Models to compare
For a model shortlist, compare battery access and the intended charging location alongside capacity. The following are listed product-page specifications; confirm the battery version and charging arrangement against the quoted configuration.
- 20 Inch Folding Electric Bike — listed 48V lithium battery options of 10–25Ah and a retractable battery box. Consider how you will reach and handle the battery where the bike is parked.
- 20 Inch Step-Through Electric Bike — listed 48V lithium battery options of 10–25Ah. Include charging access in a demonstration of the complete step-through model.
- Brown Bear 20 Inch Fat Tire Electric Bike — listed 48V lithium battery options of 10–21Ah, with a frame-mounted enclosure. Check the charging arrangement for the selected version.
Compare the wider BG EBIKE electric bike range. Shared nominal voltage does not establish shared charger compatibility.
Planning an e-bike order for your customers?
Send your shortlisted models, destination market, quantity and charging-access requirements. BG EBIKE’s MOQ is flexible by model, with mixed models allowed. We reply within 24 hours on working days; a PDF catalogue is available on request.
Request a model and configuration quote